Getting Started with your first Azure Load Test
On this page
Introduction
As described in my previous blog, “An introduction to the Microsoft Azure Load Testing Service” load testing is an important step in ensuring that your web application or website can handle the expected load before going into production. I already described the Azure Load Service, explained why you should load test your Applications, and gave a real-world example. This blog post will guide you through creating an Azure Load Testing Resource and doing your first quick Azure Load Test against the simple Web App.
1. Requirements
Before you can deploy the Azure Load Testing Resource, you will need an Azure Subscription and a target, which is your application or a website. I’ve been using a sample web app I previously created – please, do not use load tests on sites you don’t own.
2. Setting up an Azure Load Testing resource
2.1 via the Azure Portal (GUI)
-
Sign in to the Azure portal (https://portal.azure.com) and look for the Azure Load Testing Resource in the Azure Search Bar on the top of the Portal Site or navigate to the “Create a resource” page on the Navigation bar to the left.
-
Search for and select “Azure Load Testing (Preview)” and then click “Create.”
-
Fill in the required information, such as the subscription, resource group, name, and location, then click “Review + Create.”
-
Once the validation of the deployment is complete, click “Create” to deploy the Azure Load Testing resource.
2.2 via the Cloud Shell (CLI)
You can also create an Azure Load Testing Resource via the Azure CLI. For this, you need to download the az load extension, which is currently in preview. With the first run of azure load create in a CLI, you will be asked if you want to install the extension.
### Log into Azure
az login

## Create an Resource Group
az group create --location northeurope --resource-group AzureLoadTestDemo

## Create the Azure Load Testing Resource
az load create --name alt-PewPew --resource-group AzureLoadTestDemo --location northeurope
3. Run a quick Azure Load Test
-
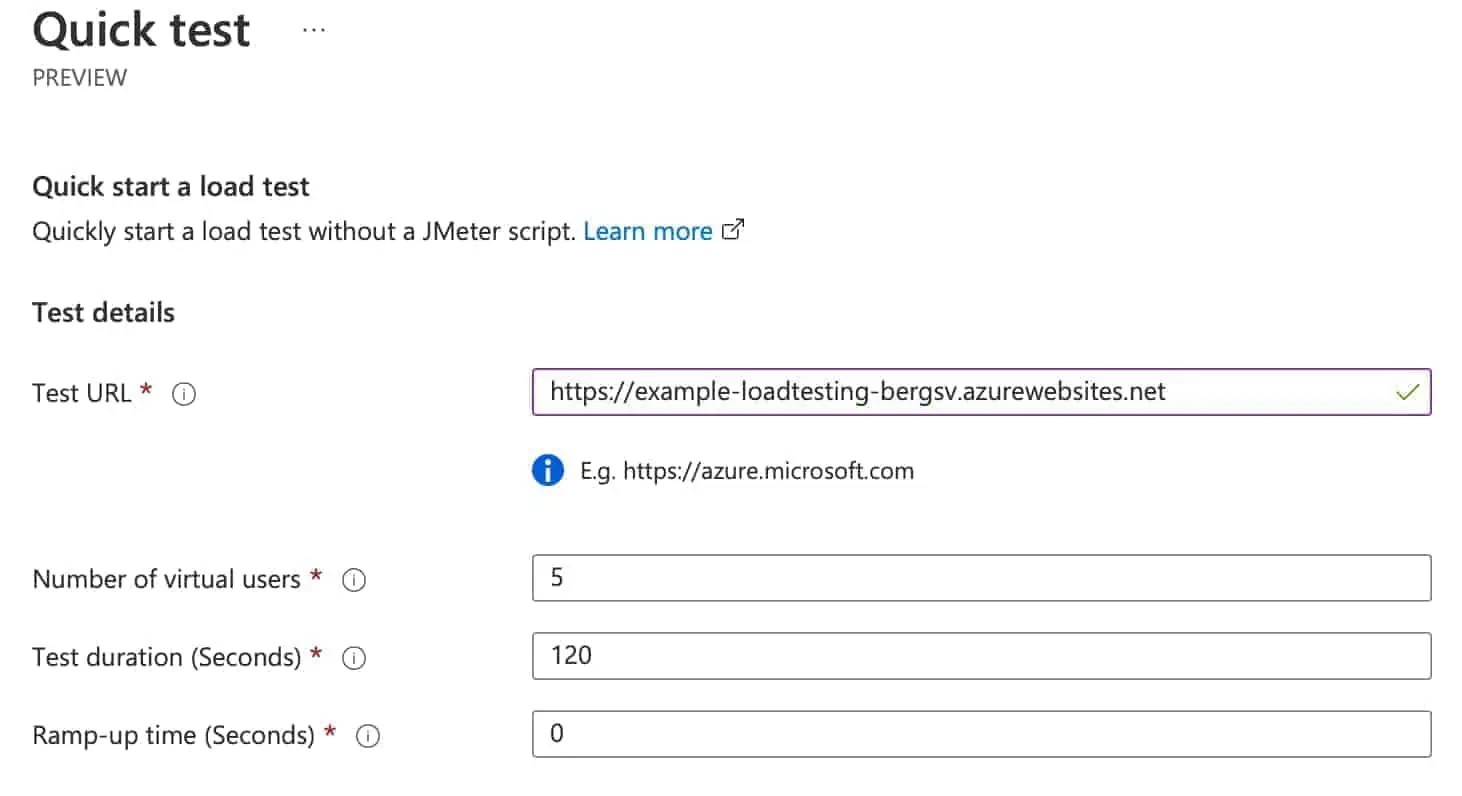
From your Azure Portal, go into the Azure Load Testing Resource and select the “Quick start” option to create a new test.
-
Fill in the required information in the Test details form:
-
Test URL:
The complete URL Endpoint which you want to test against. For e.g., my web app https://example-loadtesting-bergsv.azurewebsites.net. -
Number of virtual users/threads:
With Virtual Users or in JMeter slang “threads”, you specify how many virtual users/sessions test your website. You can select a maximum of 2500 Users; each Azure Load Testing Instance can hold up to 250 Users, and if you’re over 250 Users, further instances will be spawned, and the users will be evenly distributed on them. -
Test duration in seconds:
Duration of the Load Test -
Ramp-up time in seconds:
Time until the maximum number of users is reached for load testing your application or website. For example, you got 60 virtual users and set a ramp-up time of 120 seconds. So, the load testing will add one user to the test every two seconds.
-
-
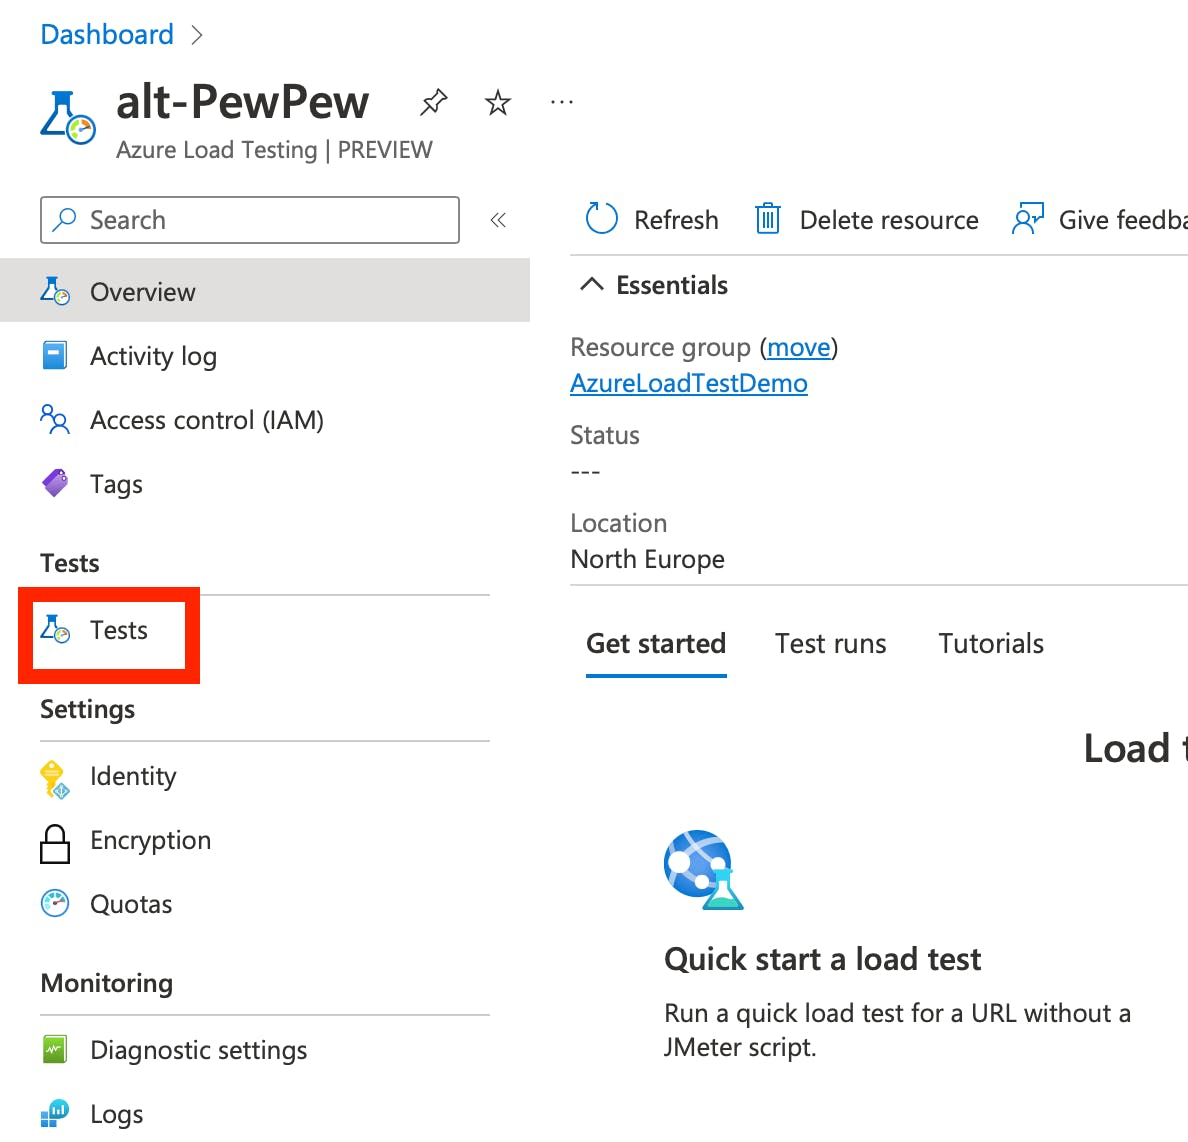
Start the test with “Run test” and you will be redirected to the details pane of the started test; here, you can monitor the stats in real-time. When your test takes longer, you can also leave it running; the run will be saved, and you can re-open it later. For this, go to the Azure Load Testing Resource; you can navigate then to “Tests” in the left Navigation and pick from a list of load tests. When you click on your corresponding load test, you can see the previously made runs of this test (a load test can have multiple runs). Go further and click the run you started.
-
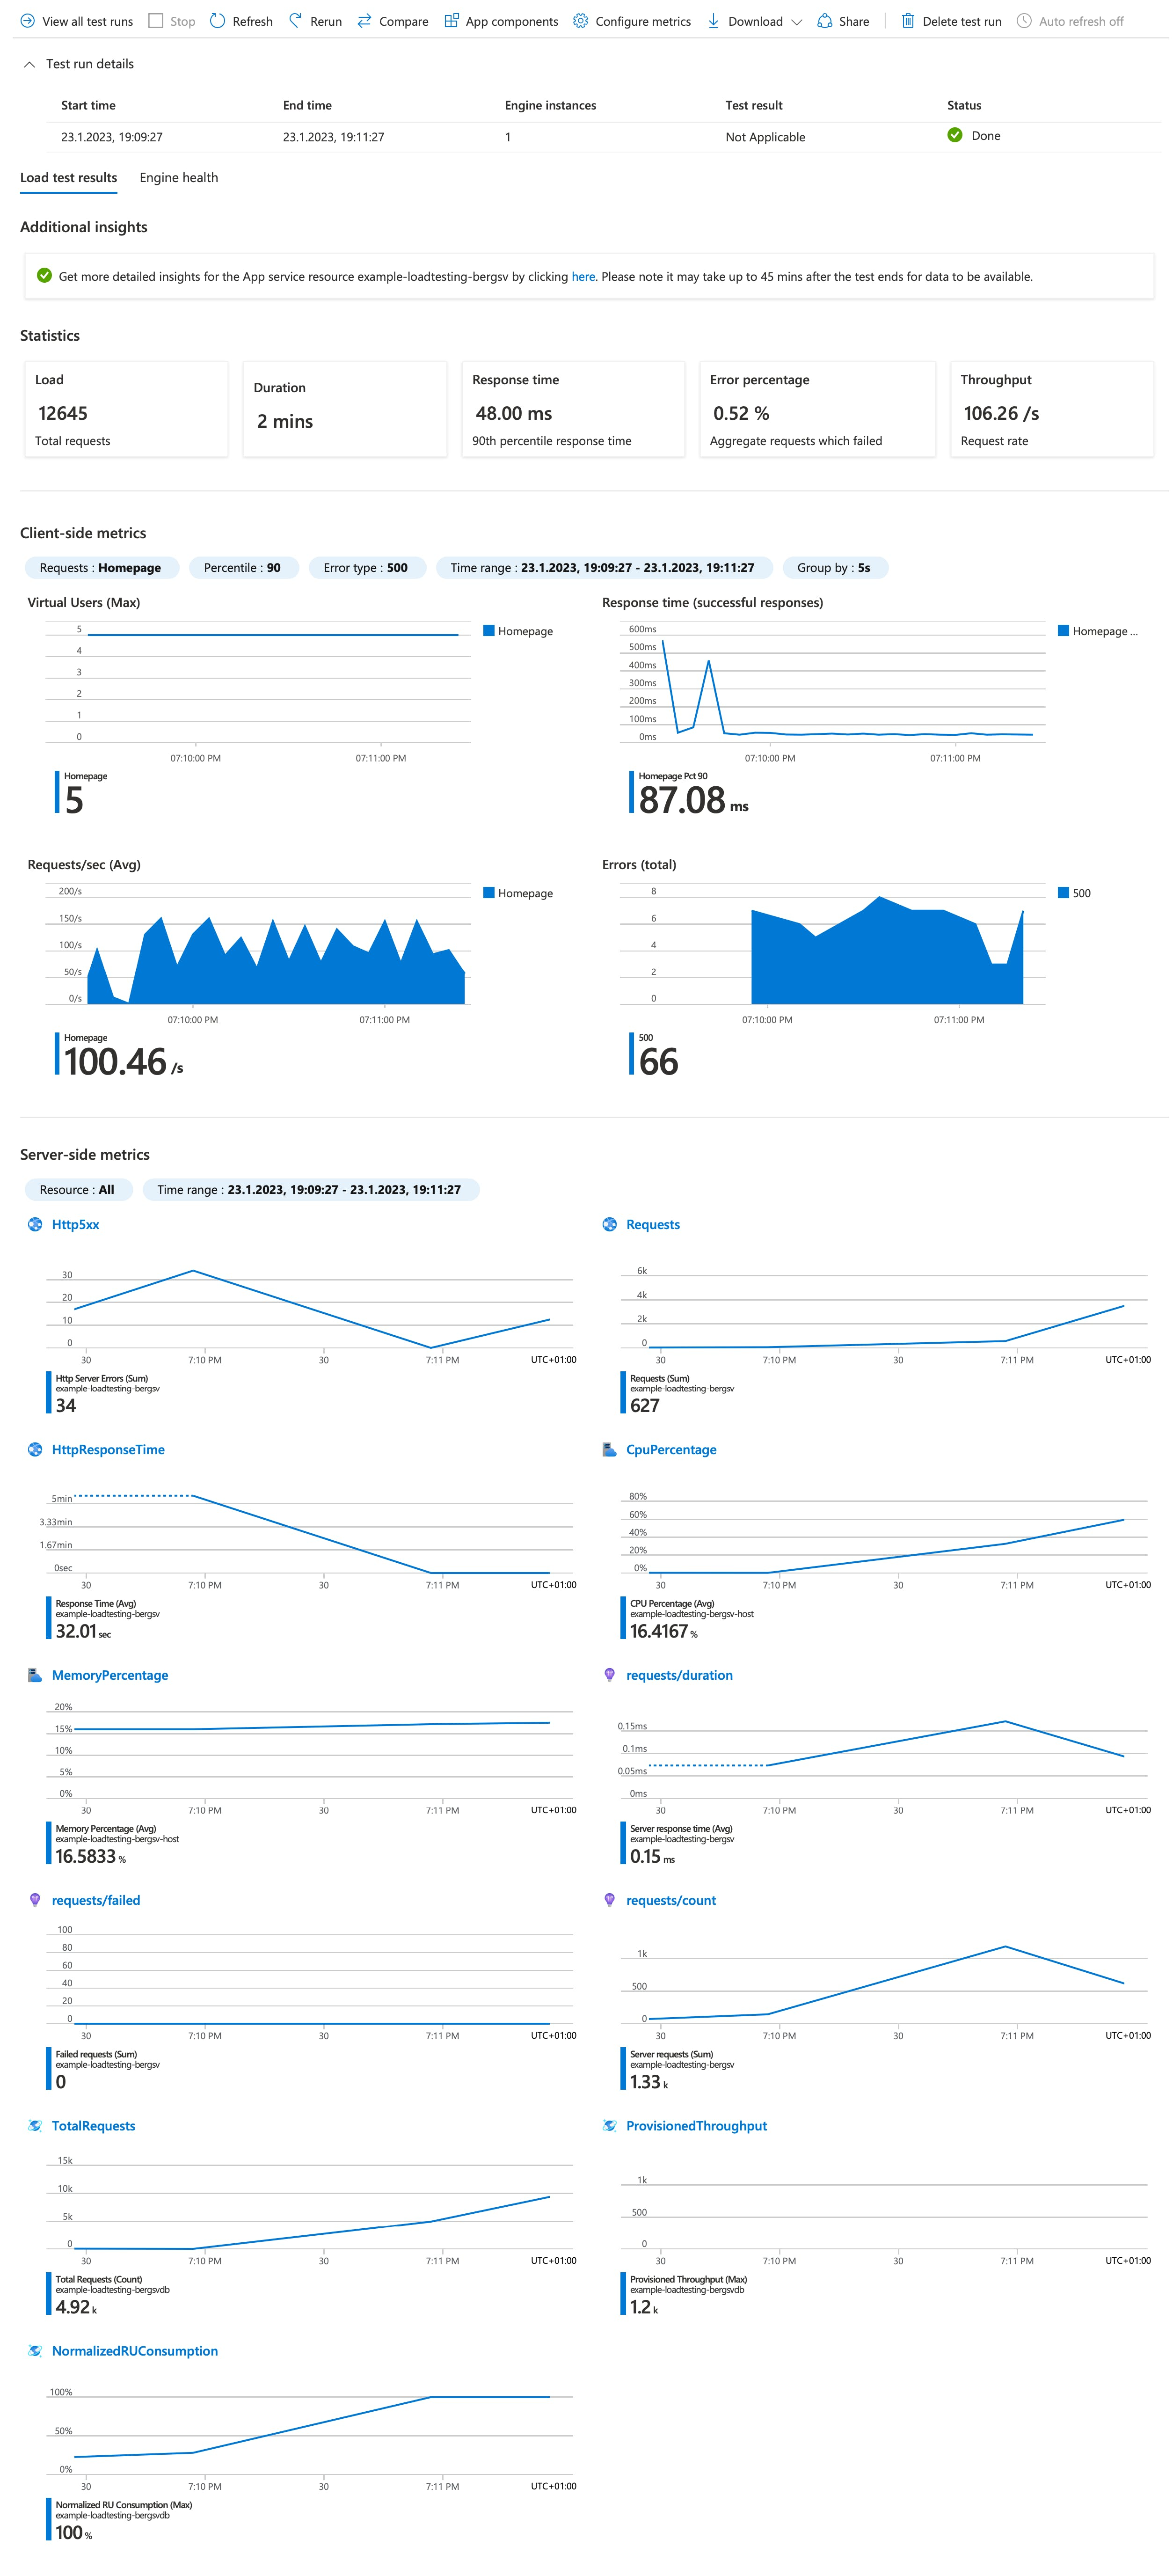
Once the load test is finished, you can evaluate the results, share them, repeat the test, compare it to previous tests, download the data as CSV, or include “App Components” in the results. This feature is awesome, as it allows you to integrate Azure resources, such as App Services or Virtual Machines, into the test. With these components included, you can view the metrics (such as CPU or memory usage) of the Azure resources being tested on the same page as the load test results, enabling you to analyze and understand how they performed during the test.
-
-
Following the key statistics, a load test will provide you with:
-
Load: The number of requests in total simulated during the test.
-
Duration: How long the test ran.
-
Response time: How long it takes the system to respond to a user’s request. A lower response time means the system performs well, and users don’t have to wait until the website responds.
-
Error percentage: The percentage of requests that failed during the test. A low error percentage means the system is performing and answering well. It’s the sum of HTTP 4xx and 5xx errors a website could give when overloaded.
-
Throughput: How many requests the system could handle per second. Of course, higher throughput means the system can take a high number of requests. Mathematically: “load in total” / “duration” = throughput.
-
4. Conclusion
By simulating a high number of users or requests, load testing allows you to identify potential bottlenecks and performance issues before they affect real users.
The results of a load test provide valuable insights into the system’s behavior under load, including the number of concurrent users or requests that can be handled, response times, error percentages, and throughput. These statistics can be used to evaluate the performance of the system and identify areas for improvement.
It’s important to keep in mind that the results of a load test will vary depending on the specific system or application being tested, as well as the test conditions. Therefore, it’s essential to compare the results of load tests over time, and to compare them to industry standards or benchmarks if possible. Additionally, it can be helpful to review the system’s performance during the test, such as monitoring CPU and memory usage, to get a better understanding of how the system performed.
Resources
https://learn.microsoft.com/en-us/cli/azure/load?view=azure-cli-latest
https://learn.microsoft.com/en-us/azure/load-testing/concept-load-testing-concepts